
You’re speeding down a river in a canoe. Before you know what has happened, you flip out of your canoe and you wake up next to your friend with a roaring fire in front of you. He says, “I used that bow drill kit lying there to make a friction fire. Would you be interested in learning how to do it?” All he had brought with him was some food, water, and a knife. You notice a few pieces of oddly shaped wood near the fire. Would you like to learn how he did it?
If you would reply yes to learning how to make a friction fire then read on.
The first thing you should know is what a bow drill kit consists of. With the bow drill, there is the fire board, the spindle, the hand hold, and the bow. These things when put together with a lot of know-how will allow you to make a friction fire!
The fire board is just a rectangular plank of wood, flat on all sides. It can be as long and as wide as you want it to be, but the width must be at least wider than the spindle. You want the board to be about ¾ of an inch thick. It could be from a tree branch or from a section of a tree trunk, or even from tree roots. Many types of wood work, and some tree species work better than others. For this bow drill kit let’s assume you are using wood from a Western Red Cedar.
Next is the spindle. It should be well rounded. It can be as long as you want it to be, but no less than 5 inches. The top ¾ of an inch should be carved to a point. The bottom should be carved round. The bottom doesn’t have to be smooth, but the middle should be as smooth as you can make it. It should be around ¾ of an inch thick, but it can be a little bigger or smaller. It too can be from a tree branch or a section of a tree trunk or possibly even tree roots.
Now, onto the hand hold. This can be made out of a cool rock you find, or just a piece of wood you carve from a tree branch, tree trunk, or tree roots—the harder the better. Its size depends on the size of your hand. The only requirement for a hand hold is that it has a hole that the pointed end of your spindle will fit into without slipping out.
Last is the bow. It can be just about any stick you find on the ground as long as it is sturdy, relatively straight, and not too flexible. The length should be around the length from your armpit to your wrist. A tree branch is great for this!
You want it to be light, so don’t go out and pick up a log the size of a tree trunk. It should have a notch in each end and a string tied on fairly tight. Now that you have all the pieces you can go make a friction fire! How?
First I’m going to give you some information about the type of wood you could use. Wood from a cedar tree is a great wood to start out with. It is a soft wood that burns well.
Making a bow drill kit from different parts of the tree may make it easier or harder depending on the type of tree. For instance, you may get wood from a tree trunk and it works great. But then you try wood from a branch from the same tree and you can’t even get smoke. You could also try using the wood from tree roots or an old stump. I challenge you to try different parts of different trees to see what works for you.
Remember to be respectful of the tree. Don’t go chopping down the tree to get a little piece from the tree roots. Find a tree that is already fallen and take some from that. You can likely find a tree branch that is already dead and dried out still hanging off the tree, rather than harvesting a live branch.
Now that you know all about what to use, you can learn how to use it. Let me start by explaining that the bow drill kit alone is not what allows you to make a friction fire. The bow drill actually makes smoke and dust and when combined with the heat of friction it makes a coal.
The coal is then put into a bundle of finely shaved dry materials such as the inner bark of a cedar tree. You blow on the coal to ignite the bundle into flame. Then pile small dry sticks on it and… viola! You have fire.
Now I will explain the details of using your bow drill kit. Start with your fire board. Cut out a shallow hole in the face of the board. It should be just deep enough so the rounded end of your spindle will fit into it without slipping out.
The location of this hole depends on how thick your spindle is. A good rule to follow is the center of your hole should be the exact width of your spindle away from the long edge and at least that far from all the other edges.
Next, you should wrap the string of your bow around your spindle. This can be challenging. With the string already attached to the bow, hold the bottom of the spindle and twist it onto the string. It should be as tight as you can get it. You will have to hold it so it doesn’t flip out so you may not want to do this until you are in position.
If you are right-handed follow the next instructions. If you are left-handed simply do the opposite.
Hold the bow with your right hand. Step on the fire board with your left foot to hold it in place. Then get into a kneeling position with your right knee on the ground behind you. Set the spindle in the hole you carved, rounded end down. (It should still have the bow attached to it.) Insert the top, pointed, end of the spindle into the hand hold, and hold down with your left hand.
Your left wrist should be snuggly against your left shin for balance.
Move the bow forward and backward keeping pressure down on the hand hold. This is the technique you will use when you begin.
One thing to know before you start is that the top of the spindle and the hand hold may burn. You don’t want your spindle to burn from the top down. Also if the hole in your hand hold gets too deep, you might have the problem of your spindle having too much friction and not spinning well.
So you need to use some sort of lubricant. I wouldn’t suggest going into the garage to get some oil. I find that the needles of a hemlock tree work very well. Just put them in the hand hold and mash them up with your spindle. If you are feeling adventurous you could even use wax, from your ears. Balm also works well.
Get into the position and move the bow back and forth, slowly at first, until you are confident the spindle won’t slip out. Then you can begin to go faster. You want to keep going until the hole on your fire board is burned in slightly.
Now you need to cut a notch in the side of your fire board. You want this notch to look like 1/8 of a pie; the endpoint being right in the middle of your burned hole coming out all the way to the edge.
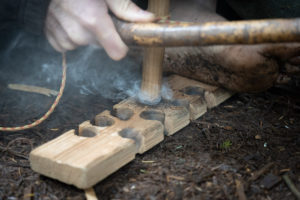

The reason for the notch is to have somewhere for the dust to fall and hold it in place. Start out slow with the bow movements to fill the notch with dust. Then you want to go faster and make some smoke on that pile of dust. After you have a nice pile of dust and are getting smoke go as fast as you can for about 20 bow strokes and then stop. If you are fortunate there will be a pile of smoking dust in your notch, a coal!

But more then likely you didn’t get it on the first try. It takes lots of practice, but stick with it. You will get it.
Now, thanks to your friend who knew about bow drill, you survived and escaped hypothermia from the freezing water.
But perhaps you won’t have that person with you next time, or you won’t be the one who falls into the water. You will be glad you took the time to learn how to make a bow drill friction fire. Now, I will leave finding your way back home up to you.